커맨드 패턴 (Command Pattern)
요청 내용을 객체로 캡슐화해서 객체를 서로 다른 요청에 따라 매개변수화할 수 있다. 실행될 다양한 기능들을 캡슐화하여 재사용성이 높은 클래스를 설계하는 패턴이다. 이러한 특징 덕분에 요청을 큐에 저장하거나 로그로 기록할 수 있다.
코드에 적용해보기
일명 기가지니라는 제품을 들어본 적이 있을 것이다. 집에 존재하는 IoT 기기를 어디에서나 쉽고 편하게 조회 및 제어할 수 있는 어플리케이션을 말한다. 하나의 어플리케이션으로 여러 제품의 on, off, 기타 기능 등을 조작할 수 있다. 지금부터 직접 이 어플리케이션을 만드는 작업을 커맨드 패턴을 이용하여 진행할 것이다.

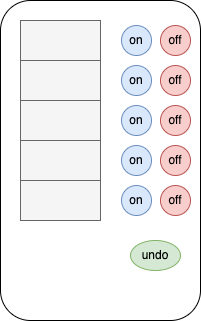
위와 같이 회색 슬롯에 원하는 제품을 끼우고 on, off, 그리고 undo(취소)까지 조작할 수 있는 어플리케이션이 있다. 하지만 모든 제품이 단순히 on, off 기능만 존재하는 것은 아니다. 티비의 경우 on, off, 볼륨 줄이기, 채널 바꾸기 등, 전구의 경우 on, off, 밝기 조절 등 기능이 있다. 어떤 제품이 들어오던 간에 추가, 변경이 가능해야 한다.
이럴 때 커맨드 패턴을 사용할 수 있다. 이를 사용하면 작업을 요청하는 쪽과 작업을 처리하는 쪽을 분리할 수가 있다. 바로 커맨드 객체를 추가함으로써 특정 객체(주방 조명 등)에 관한 특정 요청(불 켜기 등)을 캡슐화한다. 버튼 마다 커맨드 객체를 저장해두면 이를 이용해서 일을 처리할 수 있다.
커맨드 패턴에서는 여러가지 낯선 개념이 등장한다. 클라이언트 객체, 커맨드 객체, 인보커 객체, 리시버 객체 등이 있다. 간단하게 비유를 해보자면 식당에서 주문을 할 때 고객이 주문을 하면 그 주문서를 종업원이 받은 후에, 주방에 전달하여 처리한다. 요리사는 이 주문서를 보고 요리를 한다. 이때 고객은 클라이언트 객체가 되고, 주문서는 커맨드 객체, 주문을 받는 행위는 setCommand()라는 메소드, 주문을 전달하여 처리하는 행위는 execute() 메소드, 주문을 받고(저장해두고) 전달하는 종업원은 인보커, 마지막으로 주방장은 리시버 객체에 해당한다.

- 가장 먼저 클라이언트는 커맨드 객체를 생성(리시버에 전달할 일련의 행동들로 구성)
- 커맨드 객체 내에는 행동과 리시버의 정보가 들어있음
- 커맨드 객체에서 제공하는 메소드는 execute() 하나, 행동들을 캡슐화하여 리시버에 있는 특정 행동을 처리
- 클라이언트는 인보커 객체의 setCommand() 메소드 호출, 이때 커맨드 객체 넘겨줌
- 인보커에서 커맨드 객체의 execute() 메소드 호출
- 리시버에 있는 행동 메소드 호출
커맨드 인터페이스를 구현하는 것은 아주 간단하다. 실행 메소드 하나만 들어있기 때문이다.
public interface Command {
	public void execute();
}
조명을 켜고, 끄는 커맨드 클래스를 각각 구현하면 다음과 같다.
public class LightOnCommand implements Command {
	Light light;

	public LightOnCommand(Light light) {
		this.light = light;
	}

	public void execute() {
		light.on();
	}
}
public class LightOffCommand implements Command {
	Light light;

	public LightOffCommand(Light light) {
		this.light = light;
	}

	public void execute() {
		light.off();
	}
}
light를 인스턴스 변수로 선언한 이유는 거실 조명인지, 화장실 조명인지를 전달하는 정보를 담기 위함이다. execute() 메소드가 호출되면 light객체가 해당 요청의 리시버가 된다.
우선은 하나짜리 기능을 가진 어플리케이션을 만들어보자.
public class SimpleApplication {
	Command slot; // 커맨드를 저장할 슬롯

	public SimpleApplication() {}

	public void setCommand(Command command) { // 슬롯을 가지고 제어할 명령을 설정하는 메소드
		slot = command;
	}

	public void buttonWasPressed() {
		slot.execute();
	}
}
public class Test {
	public static void main(String[] args) {
		SimpleApplication app = new SimpleApplication(); // 리보커 역할 (커맨드 객체를 인자로 받음)
		Light light = new Light(); // 리시버
		LightOnCommand lightOn = new LightOnCommand(light); // 커맨드 객체 생성 (리시버 전달)

		app.setCommand(lightOn); // 커맨드 객체를 인보커에게 전달
		app.buttonWasPressed();
        	// 조명이 켜졌습니다
    }

}
커맨드 객체는 일련의 행동을 특정 리시버와 연결하여 요청을 캡슐화한다. 행동과 리시버를 한 객체에 넣고 execute() 메소드 하나만을 외부에 공개한다.

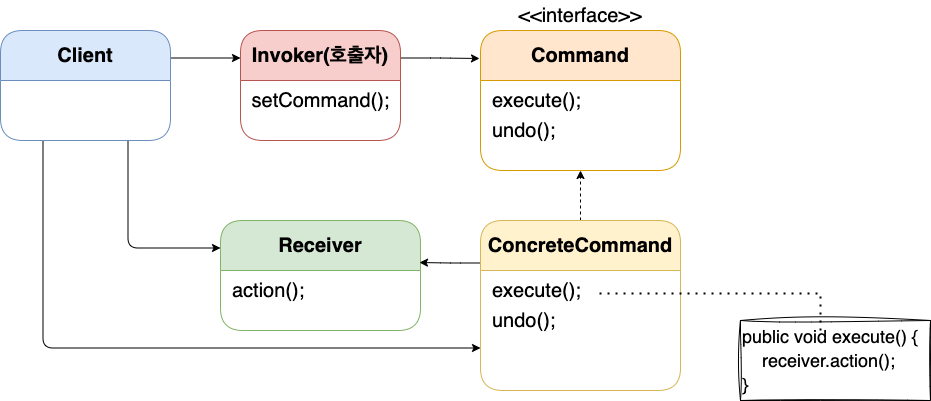
클라이언트는 ConcreteCommand를 생성하고 리시버를 설정한다. 인보커에는 명령이 들어있고 execute() 메소드를 호출하여 커맨드 객체에게 특정 작업을 해달라고 한다. 커맨드 인터페이스는 모든 커맨드 객체에서 구현해야 한다. 모든 명령은 execute() 메소드를 통해 수행되며 리시버에게 특정 작업을 수행하라고 전달한다. ConcreteCommand 객체의 execute() 메소드에서는 리시버에 잇는 메소드를 호출하여 요청된 작업을 수행한다. 즉, 이 구상 클래스는 특정 행동과 리시버를 연결한다. 인보커에서 execute() 호출로 요청을 하면 여기서 리시버에 있는 메소드를 호출하여 해당 작업을 처리한다. 리시버는 요구 사항을 수행할 때 어떤 일을 처리해야 하는지 알고 있다.
정리하자면 인보커(호출자)와 리시버(수신자)의 의존성을 없애는 설계 방식이다. 따라서 실행될 기능이 변화되어도 호출자는 영향을 받지 않고 기능들을 그대로 호출할 수 있다.
- Command : 실행될 기능에 대한 인터페이스, 실행될 기능을 execute() 메소드로 선언
- ConcreteCommand : 실제로 실행되는 기능을 구현
- Invoker : 기능의 실행을 요청하는 호출자 클래스
- Receiver : ConcreteCommand에서 execute() 메소드를 구현할 때 필요한 클래스이자 기능을 실행하기 위해 사용하는 수신자 클래스
이제 이어서 처음에 만들기로 했던 여러개의 제품은 조작하는 어플리케이션을 만들어보자.
public class Application {
	Command[] onCommands;
	Command[] offCommands;

	public Application() {
		onCommands = new Command[4];
		offCommands = new Command[4];

		Command noCommand = new NoCommand();
		for (int i = 0; i < 4; i++) {
			onCommands[i] = noCommand;
			offCommands[i] = noCommand;
		}
	}

	public void setCommand(int slot, Command onCommand, Command offCommand) {
		onCommands[slot] = onCommand;
		offCommands[slot] = offCommand;
	}

	public void onButtonWasPushed(int slot) {
		onCommands[slot].execute();
	}

	public void offButtonWasPushed(int slot) {
		offCommands[slot].execute();
	}

	public String toString() {
		StringBuffer stringBuff = new StringBuffer();
		stringBuff.append("\n------ 어플리케이션 작동 -------\n");
		for (int i = 0; i < onCommands.length; i++) {
			stringBuff.append("[slot " + i + "] " + onCommands[i].getClass().getName()
				+ "    " + offCommands[i].getClass().getName() + "\n");
		}
		return stringBuff.toString();
	}
}
public class Light {
	String location = "";

	public Light(String location) {
		this.location = location;
	}

	public void on() {
		System.out.println(location + " 조명이 켜졌습니다");
	}

	public void off() {
		System.out.println(location + " 조명이 꺼졌습니다");
	}
}
public class Test {

	public static void main(String[] args) {
		Application application = new Application();

		Light livingRoomLight = new Light("거실");
		Light kitchenLight = new Light("주방");

		LightOnCommand livingRoomLightOn =
				new LightOnCommand(livingRoomLight);
		LightOffCommand livingRoomLightOff =
				new LightOffCommand(livingRoomLight);
		LightOnCommand kitchenLightOn =
				new LightOnCommand(kitchenLight);
		LightOffCommand kitchenLightOff =
				new LightOffCommand(kitchenLight);

		application.setCommand(0, livingRoomLightOn, livingRoomLightOff);
		application.setCommand(1, kitchenLightOn, kitchenLightOff);

		System.out.println(application);

		application.onButtonWasPushed(0);
		application.offButtonWasPushed(0);
		application.onButtonWasPushed(1);
		application.offButtonWasPushed(1);

// ------ 어플리케이션 작동 -------
// [slot 0] LightOnCommand    LightOffCommand
// [slot 1] LightOnCommand    LightOffCommand

// 거실 조명이 켜졌습니다
// 거실 조명이 꺼졌습니다
// 주방 조명이 켜졌습니다
// 주방 조명이 꺼졌습니다
	}
}
두가지 슬롯만 사용하고 나머지 슬롯은 사용하지 않았기 때문에 아무일도 하지 않는 noCommand를 기본 커맨드 객체로 넣었다.
public class NoCommand implements Command {
	public void execute() { }
}
모든 슬롯에 기본 커맨드 객체로 넣어주면 비어 있는 슬롯이 없어진다. 일종의 null 객체이다. 딱히 리턴할 객체도 없고 클라이언트가 null을 처리하게 하고 싶지 않을 때 사용한다.

어플리케이션 클래스에서는 버튼마다 하나의 커맨드 객체를 할당하여 관리한다. 어플리케이션 클래스용 커맨드 객체는 커맨드 인터페이스를 구현하고 이 인터페이스에는 execute() 메소드가 존재한다.
아까부터 계속 눈에 띄는 undo() 메소드가 있는데 이는 취소 버튼이다. 조명 on을 눌렀다가 취소 버튼을 누르면 어떻게 되어야 할까. 꺼져야 한다. on을 취소했기 때문이다. 가장 먼저 커맨드 인터페이스에 undo() 메소드를 추가한다.
public interface Command {
	public void execute();
	public void undo();
}
public class LightOnCommand implements Command {
	Light light;

	public LightOnCommand(Light light) {
		this.light = light;
	}

	public void execute() {
		light.on();
	}

	public void undo() {
		light.off();
	}
}
조명을 켜는 커맨드 구상 클래스에서 undo() 메소드는 끄기를 호출하고 끄는 클래스에서는 켜기를 호출하면 된다. 어플리케이션에 취소 버튼을 넣어서 다시 작성해보자.
public class Application {
	Command[] onCommands;
	Command[] offCommands;
	Command undoCommand; // 마지막으로 사용한 커맨드 객체를 넣는 변수

	public Application() {
		onCommands = new Command[4];
		offCommands = new Command[4];

		Command noCommand = new NoCommand();
		for(int i=0;i<4;i++) {
			onCommands[i] = noCommand;
			offCommands[i] = noCommand;
		}
		undoCommand = noCommand;
	}

	public void setCommand(int slot, Command onCommand, Command offCommand) {
		onCommands[slot] = onCommand;
		offCommands[slot] = offCommand;
	}

	public void onButtonWasPushed(int slot) {
		onCommands[slot].execute();
		undoCommand = onCommands[slot];
	}

	public void offButtonWasPushed(int slot) {
		offCommands[slot].execute();
		undoCommand = offCommands[slot];
	}

	public void undoButtonWasPushed() {
		undoCommand.undo();
	}

	public String toString() {
		StringBuffer stringBuff = new StringBuffer();
		stringBuff.append("\n------ 어플리케이션 작동 -------\n");
		for (int i = 0; i < onCommands.length; i++) {
			stringBuff.append("[slot " + i + "] " + onCommands[i].getClass().getName()
				+ "    " + offCommands[i].getClass().getName() + "\n");
		}
		stringBuff.append("[undo] " + undoCommand.getClass().getName() + "\n");
		return stringBuff.toString();
	}
}
* 아래의 자료들을 참고하였습니다.
에릭 프리먼 · 엘리자베스 롭슨 · 케이시 시에라 · 버트 베이츠, 『헤드퍼스트 디자인패턴 개정판』, 서환수 옮김, 한빛미디어(2022), p225-254.
[Design Pattern] 커맨드 패턴이란 - Heee's Development Blog
Step by step goes a long way.
gmlwjd9405.github.io
'Programming' 카테고리의 다른 글
| 디자인패턴 시리즈 7. 빌더 패턴 (Builder Pattern) (0) | 2023.01.19 |
|---|---|
| 디자인패턴 시리즈 6. 템플릿 메소드 패턴 (Template Method Pattern) (2) | 2023.01.17 |
| 디자인패턴 시리즈 4. 팩토리 패턴 (Factory Pattern) (0) | 2023.01.16 |
| 디자인패턴 시리즈 3. 데코레이터 패턴 (Decorator Pattern) (0) | 2023.01.13 |
| 디자인패턴 시리즈 2. 싱글톤 패턴 (Singleton Pattern) (0) | 2023.01.12 |


댓글